We need to clarify, Officialwebhosting.net use software to start online radio shoutcast server. The server used is based on Linux, but for your everyday use Windows, do not worry because almost no relation between Linux on the server with your Windows computer. Why we use Linux servers radio? Yes, guessed it was true: because the most stable Linux!
This tutorial is intended for a computer using Windows, for Mac, the order of the steps are the same only different software installed.
The following steps online your radio.
1. Contact us to request a demo of a streaming radio server (you do not have complicated how to install a streaming radio server, nor do I need to know details on how to install SHOUT cast server on Linux servers will all be done by our team).
2. Several hours later, you will have access to shout cast server.
In an email, note three things that become your equity to connect to the shout cast server, which are: IP Address, Port, and Password radio.
3. Prepare a computer equipped with internet connection.
4. Make sure you have the Winamp program on your computer. If you do not have Winamp, download the web Winamp, click Download Winamp.
5. You must have winamp plug in (extra program) called the Shout cast DSP Plug ins, for Windows users, you must download HERE .. Linux users are also provided its DSP plug in.
Location downloading may change as you read this tutorial, but you can still track it down again with direct access to a website that is in Shoutcast.com, click the Download section and look for the link to download the Shoutcast DSP plug in. After the download is complete, install the program on your computer.
6. You must enable Shout cast DSP Plugin in Winamp you.
How: Open Winamp, then press CTRL + P (you must press the CTR and the letter P at the same time), it will exit Winamp Preferences box, see the left option settings, there is the General Preferences, Skins, and Plug-ins, point the cursor to the Plug-ins, and click on DSP / Effect, the new box will appear, there are three options, namely: (none), Nullsoft Shoutcast Source DSP ....., and Nullsoft Signal Processing Studio ..., select the Nullsoft Shout cast Source DSP ... by clicking it twice will display a box / new window with the title Shout cast Source, if no new window appears click the Configure button Active plug-in at the bottom. Until this stage, the stage is almost finished already online your radio. Now close the box / Winamp Preferences window and began to concentrate on the last little box that is Shoutcast Source. Before you start your online or radio broadcast, below the display pictures Preferences Winamp and Shoutcast Source.
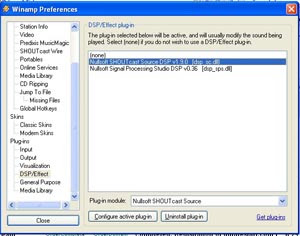 Description: Tampilan Winamp Preferences
Filesize: 39.81 KB
Viewed: 2349 Time(s)
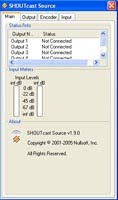 Description: Tampilan Shoutcast Source
Filesize: 26.37 KB
Viewed: 2349 Time(s)
7. Now the focus is: How do I start broadcasting / broadcast your radio.
Now check your email, look for access shoutcast server which had been sent by us. Three things I need to be checked are: IP Address, Port provided, and Password.
Then, the focus of the Shoutcast Source above. In this view there are four main tabs: Main, Output, Encoder, and Input.
Now click Output. There Output options, select Output1. Underneath is the choice of two tabs, the Connection and Yellowpages. Click the Connection first.
In this connection the main part of the most important that you should be able to run pelototin to streaming radio. If your radio does not work, this section should you change your change and check whether or not the fields that you entered. This is the heart of your streaming radio activity.
In the Address field, enter the IP number that we sent. If you order from our domain and hosting, you can request a subdomain created specifically for your radio so that this address can be filled in accordance with your streaming radio subdomain for example: radio.namaradioku.com. Remember: this form does not require the www, so just fill radio.namaradioku.com. For those who do not use a domain and hosting at our place, it is recommended to use the IP number aja.
After the address, fill in the port, enter the port that we sent. Then the last is the Password, enter the password that we provide. After you enter the password, it will automatically connect to our shoutcast servers. If you enter the correct field, then under the Status display will change to the numbers which runs as a sign you successfully connect to the shoutcast server. If his status is still connecting, means DSP you can not connect to shoutcast server, check again that you enter the field who know are wrong! Errors usually occur in ports or password.
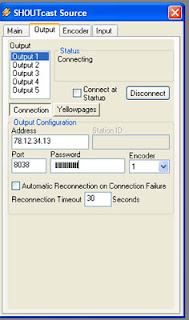 Description: Tampilan connection tab
Filesize: 44.01 KB
Viewed: 2345 Time(s)
8. Once can not connect, now the focus to the tab Yellowpages. Click the tab Yellowpages located on the right of the Connection tab. Yellowpages is useful for displaying information about your radio in your web streaming. This information will also be captured automatically by the web Shoutcast.com globally and instantly when your radio online at Shoutcast.com then there will be a list of your radio.
Remember: This section does not affect how connections or quality shoutcast server only. So if you have trouble shoutcast server, no need to check this field.
Yellowpages settings are:
Tick the checkbox by clicking on the Make this server public (Recommended).
In the Description section, fill in the name of your radio: eg Radio Rock 'n Roll Jakarta, Indonesia. Adding the name of the city and state in this description is very helpful search on the site Shoutcast.com radio.
URL: fill in your website address eg www.radioku.com
Genre: enter your radio genres, such as: Rock and Pop
In the field of AIM, ICQ, and IRC in Clear only if you do not have an account there.
On the Track Title / URL, check the Enable Title Updates, meaning the title song playing on the MP3 will change every winamp play a different song. In the Title, Clear the course and check the Auto option. At the URL just blank and check the Auto.
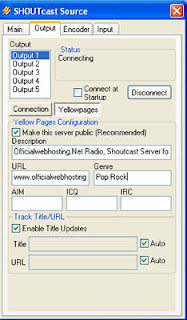 Description: Tampilan Shoutcast Yellowpages
Filesize: 49.03 KB
Viewed: 2340 Time(s)
9. Now focus on the Encoder tab.
Click the encoder tab. Encoder options are available: select Encoder1.
In the Encoder Type: select MP3 Encoder.
In the Encoder Settings: select a maximum of 24 kbps or 32 kbps.
Note: some of the friends who have tried shoutcast server prefer AAC + Encoder. You can easily change the Encoder Type to the AAC + encoder, then select the Encoder Settings to around 24 kbps - 32 kbps. AAC + option is felt to be more than trible MP3 encoder.
The higher the kbps rate you choose, the better the audio quality but there is a risk that not all Internet users can listen to your radio. Only listeners with a good internet connection (eg 3G) which freely hear your radio.
According to the recommendations Shoutcast.com, our brave new pairs of encoder at 64 kbps bitrate if the broadcaster and also the internet connection internet connection listener reach 128 kbps. In fact, in Indonesia there in 3G connection though, or 3.5 G, which actually rarely can reach 128kbps. Indosat M2 is already 3.5 G for example, average only can we enjoy the connections on the number at 50 kbps only.
So, be careful to set this bitrate.
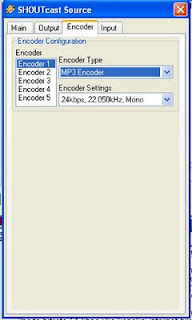
Description: Shoutcast encoder settings
Filesize: 50.64 KB
Viewed: 2336 Time(s)
10. Now you're ready to mengonlinekan your radio.
Once you can not connect with our shoutcast server, then to start the broadcast, you can test it first with playing MP3 songs from Winamp. Same way with your play mp3 songs from Winamp. When you play a song from winamp, then your radio has been filled by the song.
To listen to your radio, you have to move to other computers that have Internet connections, the address format is: nomorip: nomorport / listen.pls.
For example: ip address: 123.456.78.910
Port: 8000
So listen address: 123.456.78.910:8000 / listen.pls
It will open a new window and chose Winamp to play it.
Another way is to simply enter nomorip: nomorport
For example: http://123.456.78.910:8000, to listen click on the link Listen.
Examples of online radio display and radio are not online as below:
Note: Radio is not online will be no comment Servers Currently Down, that does not mean our server is down but you're not broadcasting radio or shoutcast server you do not get a voice input / input tracks from Winamp DSP.
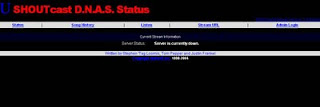 Description: This is an example display Shoutcast Server that did not receive input from the broadcaster, so it's not because the server is down but because radio is not being broadcast.
Filesize: 31.46 KB
Viewed: 2330 Time (s)
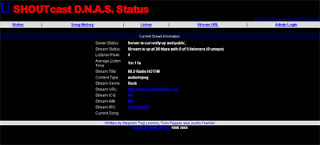 Description: Sample display shoutcast servers that are online radio.
Filesize: 28 KB
Viewed: 2331 Time (s)
1 komentar:
Listen to JilJil, Change your world.Jil jil is the famous Online Tamil FM for Tamils all over the world.
Posting Komentar